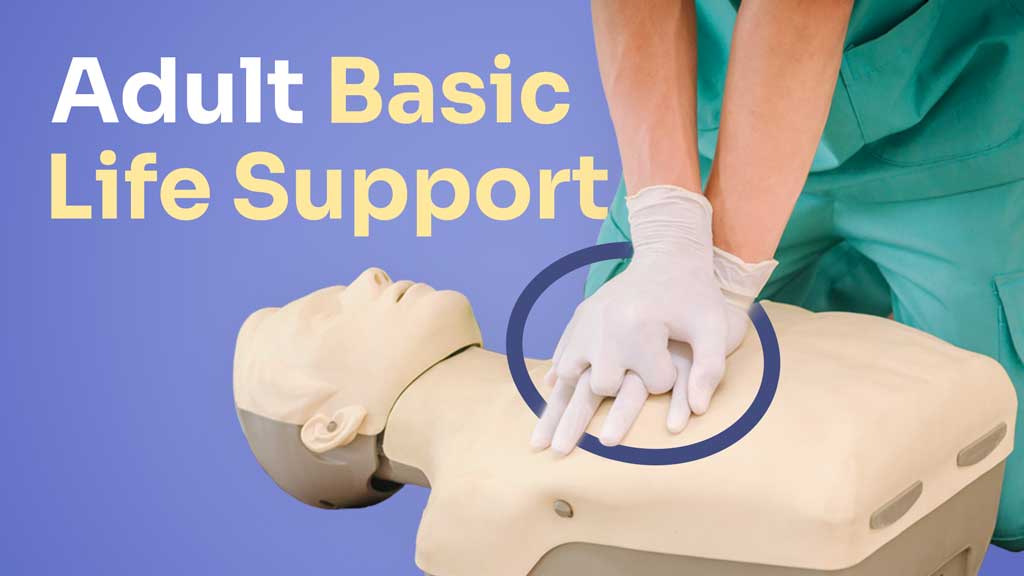
Basic life support is a crucial and potentially life-saving skill set for providing emergency treatment to a person experiencing a life-threatening illness until more advanced interventions can be performed.
It’s essential that all healthcare workers know how to correctly perform BLS.
In all Australian healthcare service settings, basic life support is an aspect of patient care directly tied to Standard 8 of the National Safety and Quality Health Service: Recognising and Responding to Acute Deterioration.
Note: The information in this article applies to adult patients/residents only.
What is Basic Life Support?
Basic life support (BLS) is a procedure used to achieve preliminary preservation or restoration of life until advanced life support can be performed. It involves establishing and maintaining airway, breathing, circulation and related emergency care using cardiopulmonary resuscitation (CPR), in addition to using an automated external defibrillator (AED) (ARC 2022).
BLS can only generate about 20 to 30% of normal cardiac output (Schlesinger 2023), so it should only be used as a temporary substitute for normal ventilation and circulation. However, early, effective BLS is associated with an increased chance of survival (Borke 2021).
What is Advanced Life Support?
Advanced life support (ALS) describes interventions that are performed additionally alongside BLS to achieve airway management, ventilation and circulation. Interventions may include advanced airway management, vascular access/therapy, and other actions (ARC 2022).
Who Can Perform Basic Life Support?
BLS can be performed by anybody, even people who aren’t medical professionals (Healthdirect 2021). The Australian Resuscitation Council holds the belief that ‘any attempt at resuscitation is better than no attempt’.
The Chain of Survival
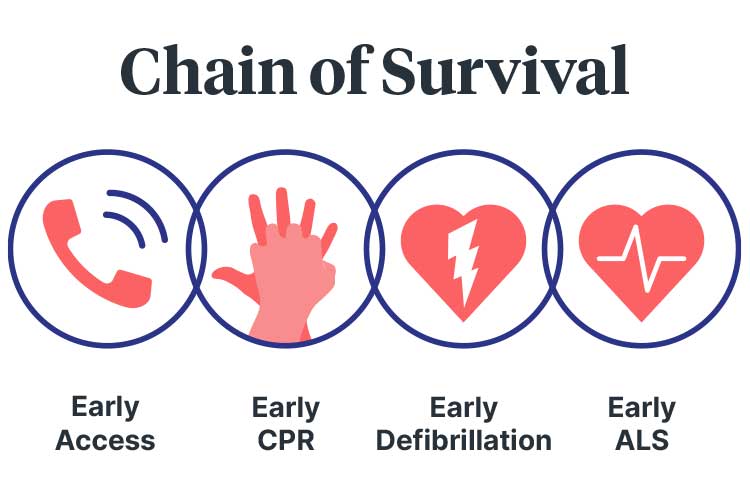
The chain of survival summarises the series of crucial actions that should be taken to resuscitate someone who is experiencing sudden cardiac arrest (SCA). These actions are vital for successful resuscitation and, when performed quickly enough, can significantly increase the likelihood of survival (St John Ambulance Victoria 2020a; Semeraro et al. 2021).
The steps are:
1. Early Access to Get Help
It’s crucial to recognise that an emergency is occurring. An ambulance should be called immediately to ensure the patient/resident receives defibrillation and life support as soon as possible (St John Ambulance Victoria 2020a).
2. Early CPR to Buy Time
In order to maintain oxygenation of the brain and other crucial organs, cardiopulmonary resuscitation (CPR) should be commenced within four minutes of cardiac arrest (St John Ambulance Victoria 2020a).
3. Early Defibrillation to Restart Heart
The patient/resident’s survival rate can be significantly improved by applying an AED as soon as possible, ideally within two minutes (ANZCOR 2024; Ambulance Victoria 2023).
Using a defibrillator within 8 to 12 minutes can significantly increase the likelihood of survival, but every minute without defibrillation decreases the chance of survival by 10% (St John Ambulance Victoria 2020a).
4. Early Advanced Life Support
The likelihood of survival can be further improved by interventions such as medication and stabilisation of the airway (St John Ambulance Victoria 2020a).
DRSABCD Action Plan
DRSABCD is an acronym used to outline the steps of BLS. They are:
- D - Dangers?
- R - Responsive?
- S - Send for Help
- A - Open Airway
- B - Normal Breathing?
- C - Start CPR
- D - Attach Defibrillator (AED).
(ANZCOR 2023)
D - Dangers?
When performing BLS, your first priority is to check the scene for danger and identify any potential hazards or risks that may jeopardise the safety of you, the patient/resident and/or bystanders (St John Ambulance Australia 2022).
Where there is more than one patient/resident in need of assistance, whoever is unconscious takes priority (ANZCOR 2024).
Dangers could include:
- The potential for violence
- Fire, smoke or fumes
- Traffic
- Confined spaces
- Unstable structures
- Electricity
- Sharps
- Dangerous weather conditions
- Deep or fast-flowing water
- Chemicals
- Biological hazards.
(IRFA 2021)
You should generally avoid moving the patient/resident, as this may cause their condition to deteriorate further. However, there are some situations where this cannot be avoided. These include moving the patient/resident in order to:
- Ensure the safety of both you and the patient/resident
- Protect the patient/resident from extreme weather conditions
- Move the patient/resident from difficult terrain
- Enable airway and breathing management (e.g. by turning the patient/resident)
- Help manage severe bleeding.
(ANZCOR 2024)
Always follow best-practice manual handling principles if attempting to move a patient/resident.
R - Responsive?
Assess whether the patient/resident will respond to verbal and tactile stimuli (this is known as ‘talk and touch’). Give them a simple command such as ‘open your eyes’ or ‘squeeze my hand’, then firmly grasp and squeeze their shoulders (ANZCOR 2024).
A person who gives no response or only a minimal response (e.g. groaning without opening their eyes) should be treated as unconscious (ANZCOR 2024).
Assess for signs of life. Lack of movement, unconsciousness, lack of breathing, or abnormal breathing may indicate no signs of life (Ionmhain 2020).
Unconsciousness may be caused by:
- Low brain oxygen levels
- Heart and circulation issues (e.g., fainting, arrhythmia)
- Metabolic issues (e.g., overdose, intoxication, hypoglycaemia)
- Brain issues (e.g., head injury, stroke, tumor, epilepsy).
(ANZCOR 2024)
S - Send for Help

Delegate someone to call emergency services and retrieve an AED if possible (Ionmhain 2020). If you are alone with the patient/resident and need to leave to call for help, place the patient/resident into the recovery position before leaving (St John Ambulance Australia 2022).
As a healthcare professional, it is your responsibility to know:
- Relevant emergency phone numbers
- The method for calling emergency codes in your clinical setting
- The location of emergency buzzers and alarms
- The location of the resuscitation trolley and emergency equipment
- Your facility’s policies and procedures.
Remember that the Australian Ambulance Service emergency phone number is 000.
A - Open Airway
Managing the patient/resident’s airway must take priority over any other injury they have, including a spinal injury (ANZCOR 2024).
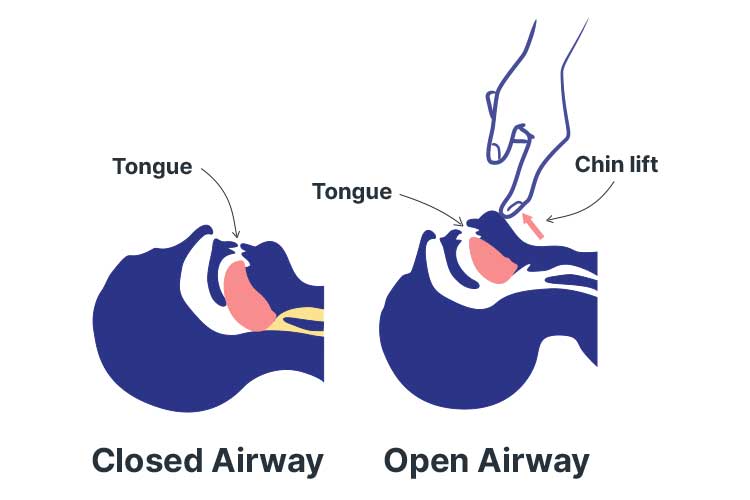
If an unconscious patient/resident is lying on their back, their tongue may fall against the back wall of their throat and obstruct airflow (as unconsciousness causes the muscles to relax). This blockage may be further exacerbated by soft tissues in the airway. Furthermore, an unconscious person will be unable to swallow or cough out foreign bodies (ANZCOR 2024).
Other potential causes of airway obstruction include:
- Foreign material such as food, vomit, blood, or secretions
- Laryngeal spasm (a reflexive closure of the trachea entrance in response to foreign matter irritating the vocal cords)
- Inflammation
- Infection
- Trauma.
(ANZCOR 2024; Brady & Burns 2023)
In order to manage the patient/resident’s airway:
- Keep the patient/resident in the position they were found in unless there are signs of airway obstruction. Always use gentle handling if moving the patient/resident.
- Clear the patient/resident’s airway by opening their mouth and turning their head slightly downwards. This will allow foreign material such as food, vomit, blood, and secretions to drain. You may use a finger sweep to manually remove foreign bodies.
- If the patient/resident’s airway becomes compromised during resuscitation, roll them onto their side to clear their airway. Once their airway is clear, reassess for responsiveness and normal breathing.
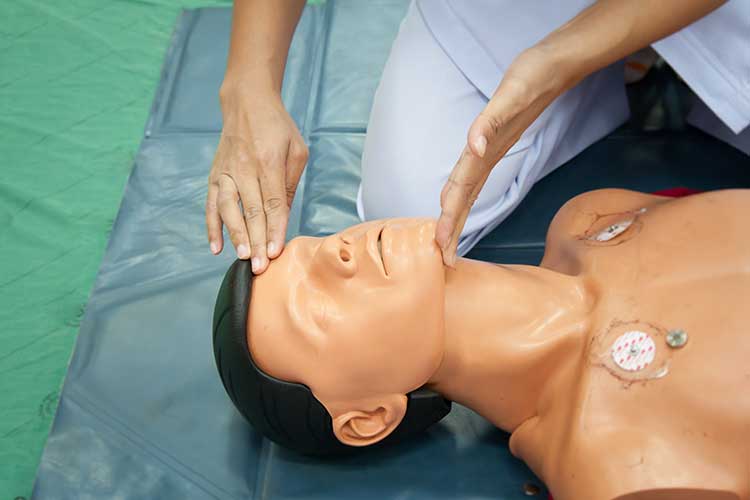
- If the patient/resident is unresponsive, use the head tilt/chin lift to open their airway. Place one hand on their forehead or the back of their head and use your other hand to hold their chin up. Tilt their head backward, holding their jaw slightly open and pulled away from their chest. This should pull their tongue and soft tissues away from the back of their throat, opening up their airway. Note that the head tilt/chin lift maneuver must not be used for infants (children under the age of one).
(ANZCOR 2024; Ionmhain 2020)
B - Normal Breathing?
If the patient/resident is unresponsive and gasping or breathing abnormally, they require resuscitation. Abnormal breathing may be caused by:
- Depression of or damage to the respiratory center in the brain
- Upper airway obstruction
- Paralysis or impairment of the nerves and/or muscles required for breathing
- Lung problems
- Drowning
- Suffocation.
(ANZCOR 2024)
When assessing the patient/resident’s breathing:
- Look for upper abdomen or chest movement
- Listen for air escaping from the nose and mouth
- Feel for air movement at the nose and mouth.
(ANZCOR 2024)
C - Start CPR
If the patient/resident is unresponsive and breathing abnormally once the airway has been opened and cleared, you must commence chest compressions and rescue breathing (ANZCOR 2024).
To perform CPR:
- Chest compressions should be performed at a rate of 100 to 120 per minute (about 2 per second) regardless of age.
- To perform a compression, place the heel of one hand in the center of the patient/resident’s lower sternum and the other hand on top of the first hand. Push down firmly, depressing the sternum about one-third of the depth of the chest for each compression (this is more than 5 cm in adults). Compressing too high may achieve inadequate depth.
- Ensure the compression rhythm is regular.
- Ensure the patient/resident’s chest completely recoils between each compression.
- If possible, rotate rescuers every two minutes to prevent fatigue and, consequently, poor compression quality
- Minimize interruptions to compressions. Do not pause compressions to check for breathing or responsiveness. CPR should only be interrupted for AED defibrillation.
- Rescuers who are appropriately trained and willing to give rescue breaths should do so. Two rescue breaths should be performed after every 30 compressions.
(ANZCOR 2024)
To perform a mouth-to-mouth rescue breath:
- Kneel next to the patient/resident’s head and keep their airway open.
- Take a breath and open your mouth as widely as possible.
- Place your mouth over the patient/resident’s slightly open mouth.
- Ensure you are keeping the patient/resident’s airway open.
- Pinch the patient/resident’s nostrils or seal them with your cheek.
- Blow to inflate the patient/resident’s lungs. The breath should be about one second in duration.
- The volume of the breath should achieve chest rise, but avoid over-inflating.
- If the chest does not rise, this may indicate obstruction or improper technique (not enough air being blown into the lungs or inadequate air seal around the patient/resident’s mouth and nose).
- After blowing air into the patient/resident’s lungs, lift your mouth away, turn your head to the patient/resident’s chest and listen for air being exhaled.
- Alternatives to mouth-to-mouth include mouth-to-nose, mouth-to-mask and mouth-to-neck stoma.
(ANZCOR 2024)
Consider using a barrier device if one is available. However, the risk of disease transmission through rescue breaths is low, so do not be deterred if a barrier device is unavailable (ANZCOR 2024).
A bag-mask device or advanced airway is advised for airway management. However, anyone using such equipment should be adequately trained and competent (ANZCOR 2024).
D - Attach Defibrillator
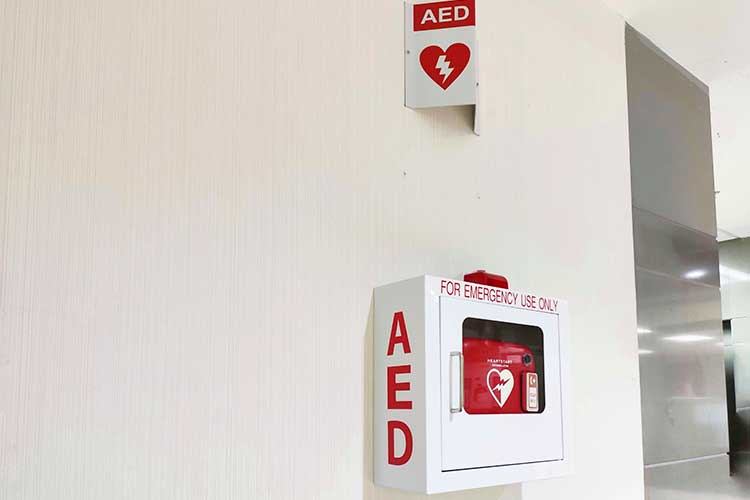
Automated external defibrillators (AEDs) are devices used to deliver controlled electrical shocks to people experiencing particular cardiac arrhythmias. AEDs are small and portable. They can be found in many public places, including supermarkets, workplaces and sporting facilities. It’s your responsibility to know the location of AEDs in your workplace. AEDs must only be used alongside CPR (NSW Health 2021; St John Ambulance Victoria 2020b).
The Ambulance Victoria AED Registry can be used to locate publicly accessible AEDs in Victoria.
In patients/residents who are unresponsive and breathing abnormally, prompt defibrillation is crucial. An AED should be retrieved as quickly as possible, as every minute of delay reduces the patient/resident’s chance of survival. Note that anyone, regardless of whether they are trained or not, can operate an AED if required (ANZCOR 2024).
CPR should be performed until an AED is retrieved, turned on and attached. Once the AED is ready, follow the prompts (ANZCOR 2024).
Proper pad placement is crucial to ensure the shock is delivered on an axis through the heart. Place one pad just below the collarbone on the patient/resident’s right chest and the second below the patient/resident’s left armpit. If the patient/resident is big-breasted, you can place the second pad lateral to the left breast instead. The chest must be exposed, and you may need to remove moisture or chest hair to ensure pad-to-skin contact. However, keep in mind that delays in defibrillation must be minimised (ANZCOR 2024).
Other acceptable pad placements include anterior-posterior (where the anterior pad is placed over the praecordium or apex, and the posterior pad is placed on the back in the left or right infrascapular region) and apex-posterior (ANZCOR 2024).
Anterior-posterior electrode placement may be used if defibrillation electrodes are at risk of overlapping (e.g. in paediatric patients) (ANZCOR 2024).
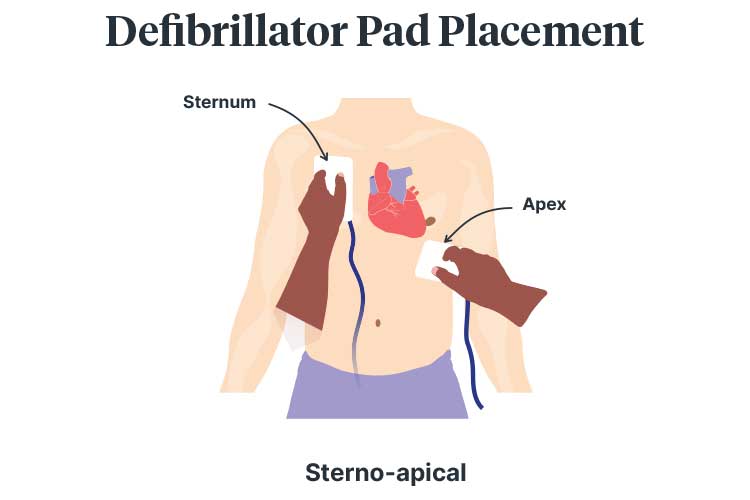
Defibrillator Pad Placement Considerations
- Implantable medical devices may hinder pad placement. The pad must be placed at least 8 cm away from these devices.
- Medication patches must be removed and skin wiped prior to pad placement.
(ANZCOR 2024)
Ensure nobody is touching the patient/resident during shock delivery (ANZCOR 2024).
Remember that AED must only be used for unresponsive patients/residents who are breathing abnormally (ANZCOR 2024).
If the defibrillation is successful, the patient/resident will have a return of spontaneous circulation (ROSC), become responsive and start to breathe independently. You should:
- Stop CPR
- Leave the AED pads attached (in case the patient/resident goes back into arrest)
- Closely monitor the patient/resident
- Place the patient/resident in the left lateral (recovery) position
- Wait for help to arrive.
(St John Ambulance 2023)
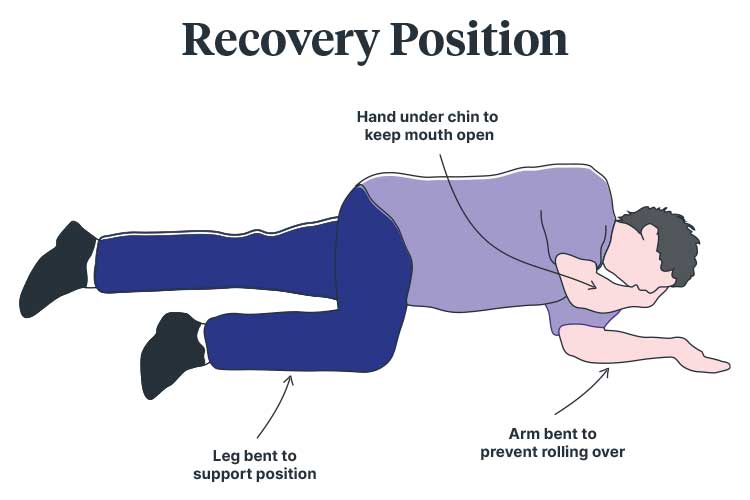
Note: There is a possibility that the patient/resident could deteriorate once again, which may require recommencement of CPR and further defibrillation as per AED if the patient/resident becomes unresponsive.
If the defibrillation is unsuccessful, continue CPR for a further two minutes and follow the AED prompts (ANZCOR 2024; St John Ambulance 2023). Only stop if:
- You are alone, and it is impossible to continue due to exhaustion
- CPR is ordered to be stopped at the discretion of a healthcare professional.
(Healthdirect 2021)
Conclusion
It is crucial that you continue to practice BLS so that when the time comes, you feel confident in your practice and clinical judgment.
Note: This is a written refresher on basic life support and is not designed to be a substitute for comprehensive education and hands-on training. Always follow your organisation's policies and procedures.
Topics
References
- Ambulance Victoria 2023, Clinical Practice Guidelines: ALS and MICA Paramedics, Victoria State Government, viewed 17 January 2024, https://www.ambulance.vic.gov.au/paramedics/clinical-practice-guidelines/
- Australian and New Zealand Committee on Resuscitation 2023, Basic Life Support, ANZCOR, viewed 17 January 2024, https://www.anzcor.org/assets/Uploads/Basic-Life-Support-August-2023-1-v3.pdf
- Australian and New Zealand Committee on Resuscitation 2024, ANZCOR Guidelines, ANZCOR, viewed 17 January 2024, https://www.anzcor.org/
- Australian Resuscitation Council 2022, Glossary, ARC, viewed 17 January 2024, https://resus.org.au/glossary/
- Borke, J 2021, Cardiopulmonary Resuscitation (CPR), Medscape, viewed 17 January 2024, https://emedicine.medscape.com/article/1344081-overview#a1
- Brady, MF & Burns, B 2023, ‘Airway Obstruction’, StatPearls, viewed 17 January 2024, https://www.ncbi.nlm.nih.gov/books/NBK470562/
- First Training 2019, First Aid Handbook, First Training, viewed 17 January 2024, https://e-learning.first-training.co.nz/wp-content/uploads/2021/11/Workplace-Course-Handbook-2019.pdf
- Healthdirect 2021, How to Perform CPR, Australian Government, viewed 17 January 2024, https://www.healthdirect.gov.au/how-to-perform-cpr
- Immediate Response First Aid 2021, D.R.S.A.B.C.D. – The Emergency Action Plan, IRFA, viewed 17 January 2024, https://irfa.com.au/lesson/d-r-s-a-b-c-d-the-emergency-action-plan/
- Ionmhain, ÚN 2020, Basic Life Support, Life in the Fast Lane, viewed 17 January 2024, https://litfl.com/basic-life-support-bls/
- NSW Health 2021, Cardiac Arrest and Defibrillators: A Guide for Consumers, New South Wales Government, viewed 17 January 2024, https://www.health.nsw.gov.au/cardiacarrest/Pages/consumers.aspx
- Schlesinger, SA 2023, Cardiopulmonary Resuscitation (CPR) in Adults, MSD Manual, viewed 17 January 2024, https://www.msdmanuals.com/en-au/professional/critical-care-medicine/cardiac-arrest-and-cpr/cardiopulmonary-resuscitation-cpr-in-adults
- Semeraro, F et al. 2021, ‘European Resuscitation Council Guidelines 2021: Systems Saving Lives’, Resuscitation, vol. 161, viewed 17 January 2024, https://www.resuscitationjournal.com/article/S0300-9572(21)00061-7/fulltext
- St John Ambulance 2023, Cardiac Arrest, St John Ambulance, viewed 17 January 2024, https://www.sja.org.uk/get-advice/first-aid-advice/heart-conditions/cardiac-arrest/
- St John Ambulance Australia 2022, DRSABCD Action Plan, St John Ambulance Australia, viewed 17 January 2024, https://stjohn.org.au/assets/uploads/fact%20sheets/english/Fact%20sheets_DRSABCD.pdf
- St John Ambulance Victoria 2020a, Chain of Survival, St John Ambulance Victoria, viewed 17 January 2024, https://www.stjohnvic.com.au/media/3086/chain-of-survival-poster-2020-v4.pdf
